How PNG Works
Portable Network Graphics (PNG) format is a lossless image format that uses a GZIP style compressor to make its data smaller. Since the image format is lossless, the compressed image quality will be identical to your source image. This is great since you can get high quality while still getting some compression, but not nearly as much as with lossy formats.
One of the biggest attractions of PNG is that it supports transparency. In addition to the red, green, and blue channels, it supports an alpha channel that defines which pixels to alpha-blend during rendering. This transparency support makes PNG quite attractive to the web, and to applications where you may want an image on screen that isn’t exactly rectangular. However, you are paying to have a fourth color channel though, which will increase the size of your uncompressed file.
This means that the format itself has been extremely popular over the last 20 years or so, but as I’ve mentioned before, it’s still not the best compressor on the planet.
Understanding the Compression
PNG’s compression process is entirely lossless; meaning that the compressed file can reconstruct the source image exactly. Done in two stages: Prediction (aka filtering) and then Compression.
#1 Filtering (prediction)
Delta encoding is one of the most powerful numeric compression methods out there. The basic idea is that you can represent any value as a difference from the previous value. So,
[2,3,4,5,6,7,8] can become [2,1,1,1,1,1,1], where [2, 3-2=1, 4-3=1, 5-4=1, 6-5=1, 7-6=1, 8-7=1]
The reason this is so powerful, is that if the data is linearly correlated (that is, value has some low-difference from the previous value) then you end up transforming values of your dataset into lots of duplicate, low values, which are more compressible.
The PNG format makes use of delta encoding in a format that it calls “filtering”. Basically, for each scan-line of pixels, a current pixel is encoded in some relation to the pixel to the left, the pixel above, and the pixel above-left.

For example if we encoded a given pixel by listing its difference between the average of A and B then we’d get:
The filtering takes ABC, and uses that to predict what the value of x is. The value that we replace x with, is the difference between the prediction, and the actual value.
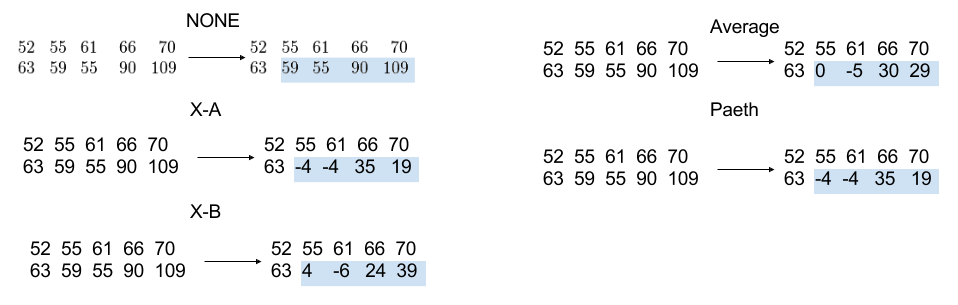
Now, it’s worth noting that each line may be a little different, which is why PNG allows 1 of 5 different modes to be chosen, per line:
- No filtering
- Difference between X and A
- Difference between X and B
- Difference between X and (A + B)/2 (aka average)
- Paeth predictor (linear function of A,B,C)
The intention here, is that each line can choose the best filtering method, for itself, such that it can produce the lowest number of unique symbols. Here’s our original example with each mode:
And, it's important to note that these filters are done, per channel not per-pixel. Meaning the filter you use for the scan-line in a red channel, could be different that the same scanline in the blue channel. (which make sense, they will be different values, after all)
And the PNG format has some nifty ways to pick which filter to use on a channel; While brute force is the most direct, it’s simply right out. Instead, the developers experimented on different image types and came up with some rules of thumb, that are close to optimal; like use None filters for palette images, and sub-8 bit grayscale images. And for the other images, choose the filter that minimizes the sum of absolute differences; Rather than using modulo-256, instead to standard signed math, then take the abs value, and add them all together for a given row, and compare the sums for the other filter types. Choose the filter that gives the smallest sum.
#2 Compression (DEFLATE)
Once filtering has occurred on a scan-line, it’s passed off to a descendant of the LZ77 algorithm, known as DEFLATE; This algorithm combines LZ77 coding alongside a Huffman coder. Which is almost identical to compressors like PKWARE, PKZIP, GZip etc. The implementation is out-of-the-box standard, but has some interesting caveats when it comes to image data.
- Deflate limits match lengths between 3 and 258 symbols; which puts the maximum conceivable compression ratio around 1032:1.
- If the match is less than 3 symbols, then you incur some overhead to represent the symbol
The result of these two, means that the size of your image can have an impact in if matches are found in a scanline.
Consider this image below, The 270x90 version is only 20k, however the 270x92 version is 2x larger.

Logically this seems wrong. Adding 540 pixels to an image shouldn’t cause a 2x bloat in compression. However when we look a little closer, we can see why this is occurring; The following heat map of the images represents how compressed a given pixel is. Deep blue = very compressed, yellow/red = not very compressed

What’s occurring here, is that in the smaller image, there’s more matches in the scanlines, and thus there’s better compression. However, adjusting the size, slightly, changes the type of matching that can occur.
Understanding the format
Now, it’s worth noting that PNG is more than just the filtering & compression stages. It’s a pretty extensible container format, that can support all sorts of image types and added data.
Let’s first start with the fact that the PNG file format can support a series of chunks inside of it which can include various types of data. For example, you’ve got the
PNG Header chunk which contains simple information about the image like width, height, bit depth & colortype.
The Image data chunk contains the actual image information itself (oh, and note, this information can exist in multiple chunks). Then for color paletted images, there’s a separate chunk for that.
And finally an end-of-file chunk. And those are the main chunks, but there’s also a whole slew of other chunks like:
- Default background color
- Chroma coordinates on how to display white-points
- Gamma spec
- Histogram info
- Text data, with language or Metadata info
- Color space information
- Stereo-image data
- A chunk which notes the last time the file was changed
- And Transparency data.
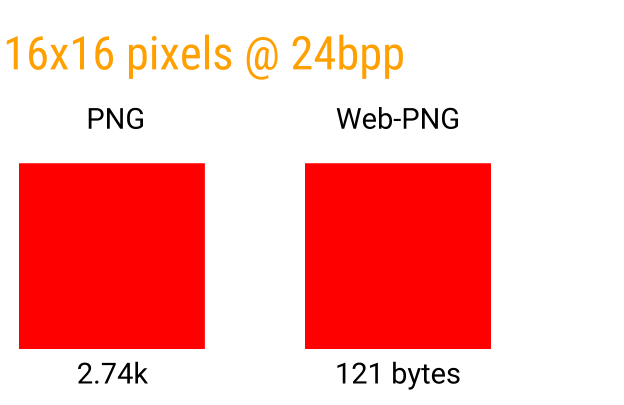
Now, these chunks are where you need to watch out, because lots of junk gets put in there by your photo editing app. For example, saving a PNG file from photoshop results in a chunk that says “this image was made in photoshop” REMOVING chunks is critical to ensuring small file sizes. The image below shows you a 16x16 pixel image, saved from photoshop as a regular PNG, and the other-one, using the “export to web” option of photoshop, which removes all the gobbledygook.
Pixel format
The PNG format can ALSO support various types of pixel formats so you can create an optimal
Indexed - 1 channel, can be 1,2,4,8 bpc
Grayscale - 1 channel, can be 1,2,4,8,16 bpc
Gray+Alpha = 2 channel, can be 8 or 16 bpc
Truecolor(RGB) = 3 channel, can be 8 or 16 bpc
RGBA = 4 channel, can be 8 or 16 bpc
Pixel formats are selected by the author of the image file. So it’s not too interesting to discuss, other than making sure you’ve chosen the right pixel format. Storing a greyscale image as a truecolor w/ alpha, is a bad idea.
Story : GIF and the birth of PNG
When it comes to the relentless bulk of web content, images are by far the largest load bearer today (although there's an argument to be made that videos have become king as of late).
But what's truly interesting is that as much as compression information can help solve some of the congestion, there's a massive amount of human problems that keep compression from making its way into everyone's hands.
Let’s take a trip back to 1985, when Unisys filed a patent for the LZW compression algorithm.
A few years later, when CompuServe invented the 89a format (which later became the GIF format), they used LZW as its backbone, not realizing that it was a patented. Unisys didn’t care about this until 1993, when the Netscape browser added support for the IMG HTML tag, alongside with support for the 89a format. Within a year, animated images became all the craze on the internet, and Unisys started enforcing its patent. CompuServe and Unisys eventually reached a court agreement in December of 1994, announcing that Unisys would start collecting royalties from all software that used the 89a graphics format. In the months following this decision, a group of engineers developed an entirely new, patent-free format known as the Portable Network Graphics or PNG format.
In 2004, the patent on LZW finally expired, but for a whole decade, the GIF/PNG image format debate was a hot one among internet folks.
In closing
PNG is a very flexible and powerful image format type that’s become popular on the web due to it’s ability to support transparency. But it’s not right for _every_ situation; Basically, make sure you’re using the best tool for the job. If your image is photographic and absolute losslessness is not required, then JPG or an equivalent lossy method would be more efficient than any lossless approach. On the other hand If you need a smaller bit-format, or need transparency, than PNG would be a dominant win over JPG.
And if you’re interested in seeing the most bare-bones implementation of a PNG coder, check out this awesome gist, which packs the whole thing into ~40 lines of code.
Of course, then there’s WebP, which will give you both.. But that’s another video ;)
~Main
You can find Colt McAnlis here:


ReplyDeleteIf you’re looking to leverage mobile technology for your business, our best app developers are at your service. We provide iOS Mobile App Development Services India and Android Mobile App Development Services India, so you can reach your customers on their favorite devices.